 Mar 26, 2020 - By Summer Swanso
 How To Make A Fabric Face Mask Cover
When my healthcare friends reached out to me for fabric face mask covers to help extend the life of their actual masks, I asked them if they had any special requests. There was a resounding request for ties over elastic. While elastic masks will happily be accepted, I went to work modifying this awesome tutorial to include ties. Why ties? Ties can be adjusted for each individual to give the mask a better overall fit. 

Supplies you will need for making your fabric mask:
*Fun quilting cotton for outside of mask
*Muslin or other cotton fabric for pocket
*twill tape
*flat pins (I love my Unicorn pins!)
*snips
Side note: If you don’t have any twill tape don’t fret! Grab your Bernina Bias Binder Attachment and let your machine make the fabric ties for you!

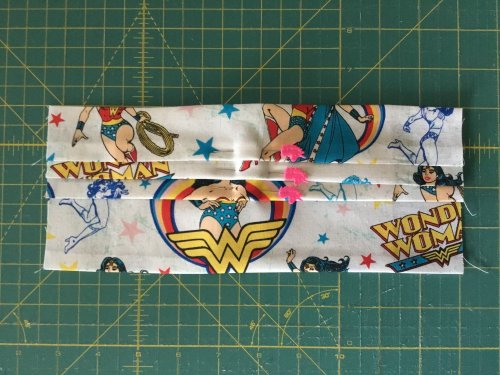
Step 1. Cut your fabrics. Main fabric measures 10” x 8”, cut one. If you are using directional fabric you will want to make sure you cut accordingly. Lining fabric measures 7” x 5.5”, cut two.
Step 2. Make a small fold at the top of both lining fabrics. Sew. No need to back stitch as these edges will eventually be sewn over.

Step 4. Sew along both lining fabrics at top and bottom of mask. Make sure to make this more than a 1/4" seam. I used the edge of my foot as a guide. The reason you want this seam a little wider is so there will be enough room when you are threading your ties through.

Step 5. Now it’s time to step over to your iron and give your fabrics a good press.

Step 6. Flip the fabric over and press again. Your mask should look like this.

Step 7. You will want to gently grab both the front and back fabrics to make a fold. Press and pin.

Step 8. Gently grab both fabrics again and make a second fold. Press and pin.
Step 9. Gently grab both fabrics again and make your third and final fold. Press and pin. I know the first few masks this may seem like a frustrating process but once you get the rhythm down it’s very easy.

This is what your folds will look like from the back.

Step 10. Now that you have all those lovely folds, you want to keep them in place. Stitch down both sides right next to that lining fabric. I find that this step works best while gently holding the folds in place on each side while feeding this through the machine. That way the folds don’t shift.

Once you’ve stitched down both sides your mask should look like this.

Step 11. Hop on over to your iron and fold your edge in until it touches that stitch line. Press.
Step 12. Fold over again and press. Grab two clips to hold your fold in place.
Both sides should look like this.
Step 13. Sew down the edge. On this step you will want to back stitch at the start and end since this is the main stitch that keeps the mask together.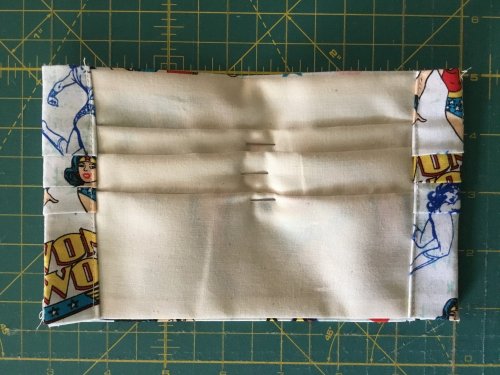
Both sides should look like this.
Now that your mask is sewn you can take out those pins. All those folds might make the pattern on your fabric look a little silly! Not to worry, once the mask is on, the pattern will show properly again.
Step 14. Cut two pieces of twill tape 36” each or use your Bernina Bias Binder Attachment to create fast folded fabric ties. You will want to use your bodkin for this next step.
Step 15. Thread your twill tape/fabric tie through your bodkin and pull through the side “pocket”.
Step 16. Once the twill tape/fabric tie is through, put a small knot at each end.
Your mask is done!


And there you have it, a modified addition to an already fabulous pattern.