 Mar 30, 2020 - By Summer Swanson
5 Steps To Easily Organize Your Fabric Stash
Hey there fellow quilting friends! I wanted to share a quick post on some fun ways to organize your stash. I started quilting almost 9 years ago and in that time I’ve acquired quite a bit of fabric. Since I don’t have a room specifically dedicated to my craft I’ve had to get pretty creative with my fabric storage. When I first started quilting I stored fabric in big Rubbermaid bins. While the bins kept my fabric safe, it was super tough to see what I had. I constantly found myself rebuying certain fabrics because I couldn’t easily access them, also out of sight out of mind. I knew I needed some kind of shelving unit to keep things neat and tidy, but with glass doors so I could easily see what I had. I scoured thrift stores, consignment shops, and finally hit the jackpot at a neighborhood yard sale. Isn’t she a beauty?
I then started the daunting task of folding all the fabric I owned. No small feat! Thankfully it went faster than I thought it would. It was also a perfect time to purge the prints that no longer felt relevant to what I was creating and then donate to a local quilting charity. While I was folding I realized I needed to figure out how I wanted to organize my beautiful stash. This decision will be different for each quilter. For me, it was important to first organize by designers. I buy a lot of different lines from my favorite designers and wanted to easily access their coordinating lines when working on projects. For example I keep all my Tula Pink together next to my Heather Ross, Cotton & Steel and so on.
Next I wanted to have the other fabrics arranged by color. All my reds and oranges together, next greens and blues, then browns, greys and blacks. I’m a big fan of Halloween & Christmas. I have a pretty large amount of holiday fabrics I wanted to be able to find easily. It only made sense to have spots for them as well.
Last but certainly not least, my charity fabrics. These are all the fabrics donated to me from others specifically for making things for charities. I needed to make sure it didn’t accidentally get mixed in with my everyday fabrics. I keep these fabrics on the top shelf.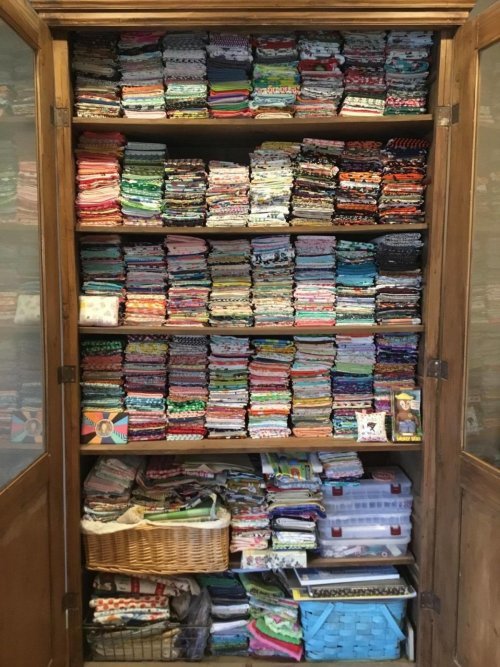
You may be wondering, what about scraps? Good question! I have several cute metal baskets that I store my scraps in. I love the basket option because I can easily grab and go when working on projects outside the home. There’s always something fun to make with scraps, and this encourages me to actually use them.
Organizing your stash can be very personal, and there is no one "perfect" way to do it but these 5 easy steps are a great place to start.
5 Steps To Easily Organize Your Fabric Stash
- Find a storage solution that you can through to easily see all of your fabrics.
- Fold all of your fabric pieces so they are the same size.
- Purge prints that you no longer want & donate to a local charity.
- Organize your stash by Designer, color, theme... whatever makes the most sense to you.
- Create a portable scrap basket to hold all of your small pieces that can’t be folded.
The benefit to having your fabrics organized is to make it ultimately easier for you to “shop” your stash. Having fabrics easily visible and accessible makes all of your quilting projects even more enjoyable. Hope some of my suggestions inspire you.